How to remove and update sale in StudentLogic

Let’s focus on the correct removing and updating of sales information in StudentLogic system this week as we have noticed it can be challenging sometimes for users to decide which option to choose.
There are few basic ways of getting rid of the sale in the system or updating sale in the system:
1. DELETE /REMOVE - any sale that has not been confirmed yet can be deleted from the system or if you care about running numbers for POS sales, you can also choose to edit the sale and use it for different customer all together. Delete function might not be available to all users but it’s generally pretty save as the only way to receive money in the system and generate receipt is by confirming your sale first to make sure the system is very safe in terms of managing sales and receivables. It’s a very good practice to remove all pending sales that have not been closed / confirmed at the end or sales with amount 0.00 whether they were created by mistake or on purpose but for whatever reason not utilized. There should not be any unconfirmed sales for a very long time (renewal period is generally an exception).
Sale cannot be deleted if membership has been sold on that sale – you need to first remove membership and only then you can delete that sale or you need to confirm and void that sale.
The best candidates for DELETE/REMOVE option are all un-confirmed sales, which are just pending in the system. Go to the sales summary screen, search for all un-confirmed sales and if the balance is “0” you can remove them directly from sales summary screen.

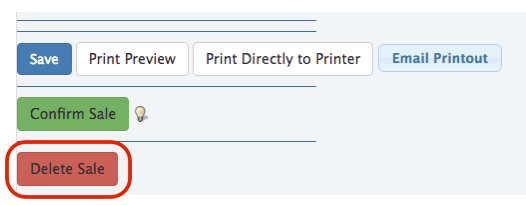
If there is still balance on the sale but sale is not confirmed, you can click inside the sale and use “Delete Sale” button to remove that sale or you can edit it to different contact (don’t forget to update sale date in such case).
2. VOID – once sale has been confirmed, it should be voided in case you made a mistake in the sale itself and you need to either change it or return money collected. Please, remember that this applies if the error is in the sale itself, not in the payment received. If the problem is only on the payment part information, use Un-offset functionality instead, if you have access rights.
Even if it’s the same day occasion, once the sale has been confirmed and you need to change it, the best practice is to void it first and then process the sale transaction again if necessary as this will leave a very obvious track-able record and you also need to put a remark why the sale was voided, which helps owners or managers to analyze why sales usually get voided and take necessary steps to avoid it in the future as much as possible. Simple adjustment in business rules might be sufficient for example. Voided sales records are also very important for your accountants who will be reviewing your sales records most probably.
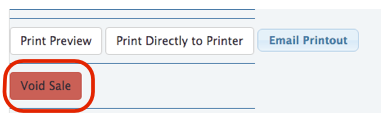
To void, go into the sale detail screen and click on button “Void”. There is no shame in voiding sales, it’s actually more correct way then trying to go around it.
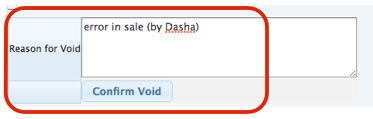
Key in the reason why would you like to void the sale for tracking and accountability purposes. This field is required. Click button “Confirm Void” to finish the voiding of the sale.
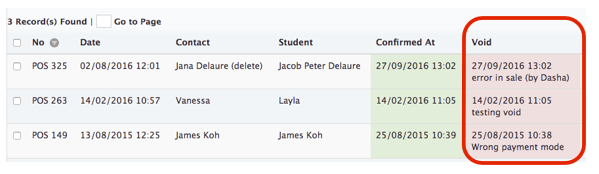
You can search for all voided sales via Sales summary screen if you wish.
Void is only possible as long as that sale is not on a “Closed Cash”. Once on a closed cash, the sale cannot be voided. You have few options what can be done then based on case to case basis (You can create Credit note to return $$ if you wish so and manually remove all attendances generated or Use “Credit Un-used attendances”). All these levels of security in the system are important to avoid any fraudulent activity in the system or simply avoid human mistakes. It’s also a motivator to learn how to use system well as soon as possible and avoid doing same mistakes over and over again as to undo sale that is already on Closed Cash can be very tedious to perform, especially to perform correctly.
Voiding sale means removing all the links created by that sale including canceling payment and attendance that was generated.
3.UN-OFFSET – If you created sale correctly and confirmed it but made a mistake in offsetting payment portion (selected wrong payment type for example), there is not need to void the sale. It’s enough to un-offset the payment (if you have access rights), which would just cancel that payment and you can offset again with correct info. This would save you lot’s of time of re-doing the whole sale from scratch if you void it.
Un-offset basically means that you are un-linking the payment info from sales info. Un-offset payment from sales detailed screen is automatically canceled (recorded under Payments summary screen as canceled) and you can offset sale again with new correct payment.

Here is example how un-offset payment is recorded under Payments summary screen.

4. REFUND – You might have situations where you need to refund $$ collected back. It’s very easy with deposits which already have quick link to create a credit note for you, you just have to offset it correctly. If it happens during withdrawal of the student, then use withdrawal widget and system would auto create correct credit notes, if applicable. Other more complex situations are if your clients pre-purchased for a very long time ahead and then suddenly want to cancel. Your business rules should determine whether you allow that kind of refund or not and if yes then you can choose to either create Credit Note manually under Invoices module. This would allow you to return $$ back but it will not be linked directly to the sale for which you are returning money for and thus reports would not be 100% correct as revenue would not be deducted correctly.

If you want the revenue to be correctly deducted with these kind of refunds, you have to use “Credit Un-Used Attendances” functionality described below. Lastly, make sure you manually cancel/expire all classes that your client cannot attend anymore if you choose to create Credit Note manually.
5. CREDIT UN-USED ATTENDANCES – this functionality needs to be used if your sale has been confirmed and paid for and client suddenly changes what kind of class they would like to attend. This will eliminate all unused attendances only (This is very important, cause if you are not taking attendance correctly, this option would not work for you.) and create a credit note for number of un-utilized classes that you can then use to offset against new correct sale or you can also choose to pay it out to the client if your business rules permit that. This functionality will decrease the revenue for correct class as it’s linked to the specific class’s sale. Thus, this functionality can only be used from the original sale screen/package sale screen as shown below.

The result of using this functionality as mentioned above is POS Sale that is auto created with negative amount based on the number of lessons that are being credited back and that can be used to offset any new sale created instead of the original one.
If you have any questions, please contact us at support@nextlogic.com.sg.
Like us on Facebook 